General workflow
Create issue
Any changes to the code should address one issue, it could be a bug or feature request. If there is no issue for the changes you want to make, you should create one by yourself.
Create branch
Use the Create a branch link on the right side of the issue details page to setup a new branch for the issue. All of your work should be done on this new branch to avoid direct influence to the main branch.
Always try to make your development branch as short-living as possible. A recommended branch life span is 1 to 2 days. If you find something not managable within 1 or 2 days, then either consider split your goal into smaller ones and create branches for these smaller goals.
Modify source
If the current main program does not fulfill your need, then you have three choices customizing the main program. They are ranked in terms of my recommendation, so you should consider choice 1 whenever possible, the choice 2, and lastly choice 3.
Here we are only introducing the general rules of customizing the main program, for more details of how to change a specific type of main program, you should go to the documentation for that main program.
- Phase-Field Ferroelectric main program
- others coming
Choice 1: Modify the existing main program
If your use case is quite useful to the general users and you just want to add a few parameters to extend the existing main program’s capabilities, then you should consider add it to the existing main program. Rule of thumb is to not influence existing parameters since otherwise your changes can break other’s program. Remember to commit and publish your changes.
Choice 2: Add a new main program in the existing repository
If your use case is useful to the general users but so different from the existing main program, for example, you’re still doing a phase-field ferroelectric simulation but now your system has an inhomogeneous setup, then you may setup a new main program in the existing repository. For the PhaseFieldFerroelctric repository that’s inside the apps folder along with our basic main program. Remember to commit and publish your changes frequently when you are building you new main program.
Choice 3: Create your own main program in a new repository
If you want to write a main program for a completely different phase-field model, then you should consider creating a new git repository and add it as a new submodule of the PhaseFieldSDK repository.
Build the code
Step 1: Open the source code folder
As we did in the Future visit of the source code.
Step 2: Activate the intel environment
HPC server
Use the module load command as mentioned in previous step. Or you may ignore this if you have already setup the ~/.bashrc file properly.
Your own Linux machine
Click F1 to open the command palette, then type intel initialize and click Intel oneAPI: Initialize default environment variabls.
Step 3: CMake Configure
Use the following command to perform the configuration step in using cmake. We are relying on cmake presets (that’s why we require version higher than 3.20) to make our usage of cmake easier and more standarized.
cmake --preset="linux-intel-Debug" -S "."In most cases, you just need to configure your project once.
Step 4: CMake Build
Once the project is configured, you can now build your project. Here we choose the linux-intel-Debug preset, you may choose other presets base on your needs.
warning
The linux-intel-Debug preset is configured to skip the license checking, so DO NOT distribute program built with this preset to any users without access to our source code, otherwise they will have unlimited access to our library subroutines.
cmake --build --preset="linux-intel-Debug"You may specify the cmake target that you want to build, for example, the default target is all.
cmake --build --preset="linux-intel-Debug" --target allI created some alias for the commands in setvars.sh, you can update your bashrc to use these aliases.
echo 'source ~/work/PhaseFieldSDK/setvars.sh' >> ~/.bashrcStep 5: Add alias for executable
The built output are located within out/build/linux-intel-Debug. The library archive file is located at out/build/linux-intel-Debug/dev/libmuprolib.a. The executables are located within their corresponding folder, such as the ferroelectric main program is located at out/build/linux-intel-Debug/apps/PhaseFieldFerroelectric/apps/basic/muFerroBasic.
To make future usage of the executables easier, we can create alias for the executables in the bashrc file. Such as for the ferroelectric executable, we can use the following command:
echo 'alias muferro="~/work/PhaseFieldSDK/out/build/linux-intel-Debug/apps/PhaseFieldFerroelectric/apps/basic/muFerroBasic"' >> ~/.bashrcTest and Debug
Debugging can be slow and painful if you don’t have the right tools for the task. I recommend using the gdb based debugger in vscode to debug your fortran program. There are definitely more choices of debugger on the market, for example, if you have relatively fast internet connection, then you may consider open a gui software like totalview on the server to debug your program, but that’s not as convenient as vscode in my opinion.
Step 1: Choose the launcher
- Click the Run and Debug icon on the vertical toolbar
- Use the dropdown to select a launcher
- Click on the left to the code line number for any file in your program to set the break points.

Step 1.5: Or create the launcher
If there is no launcher that fulfill you need, then you may create a new one yourself.
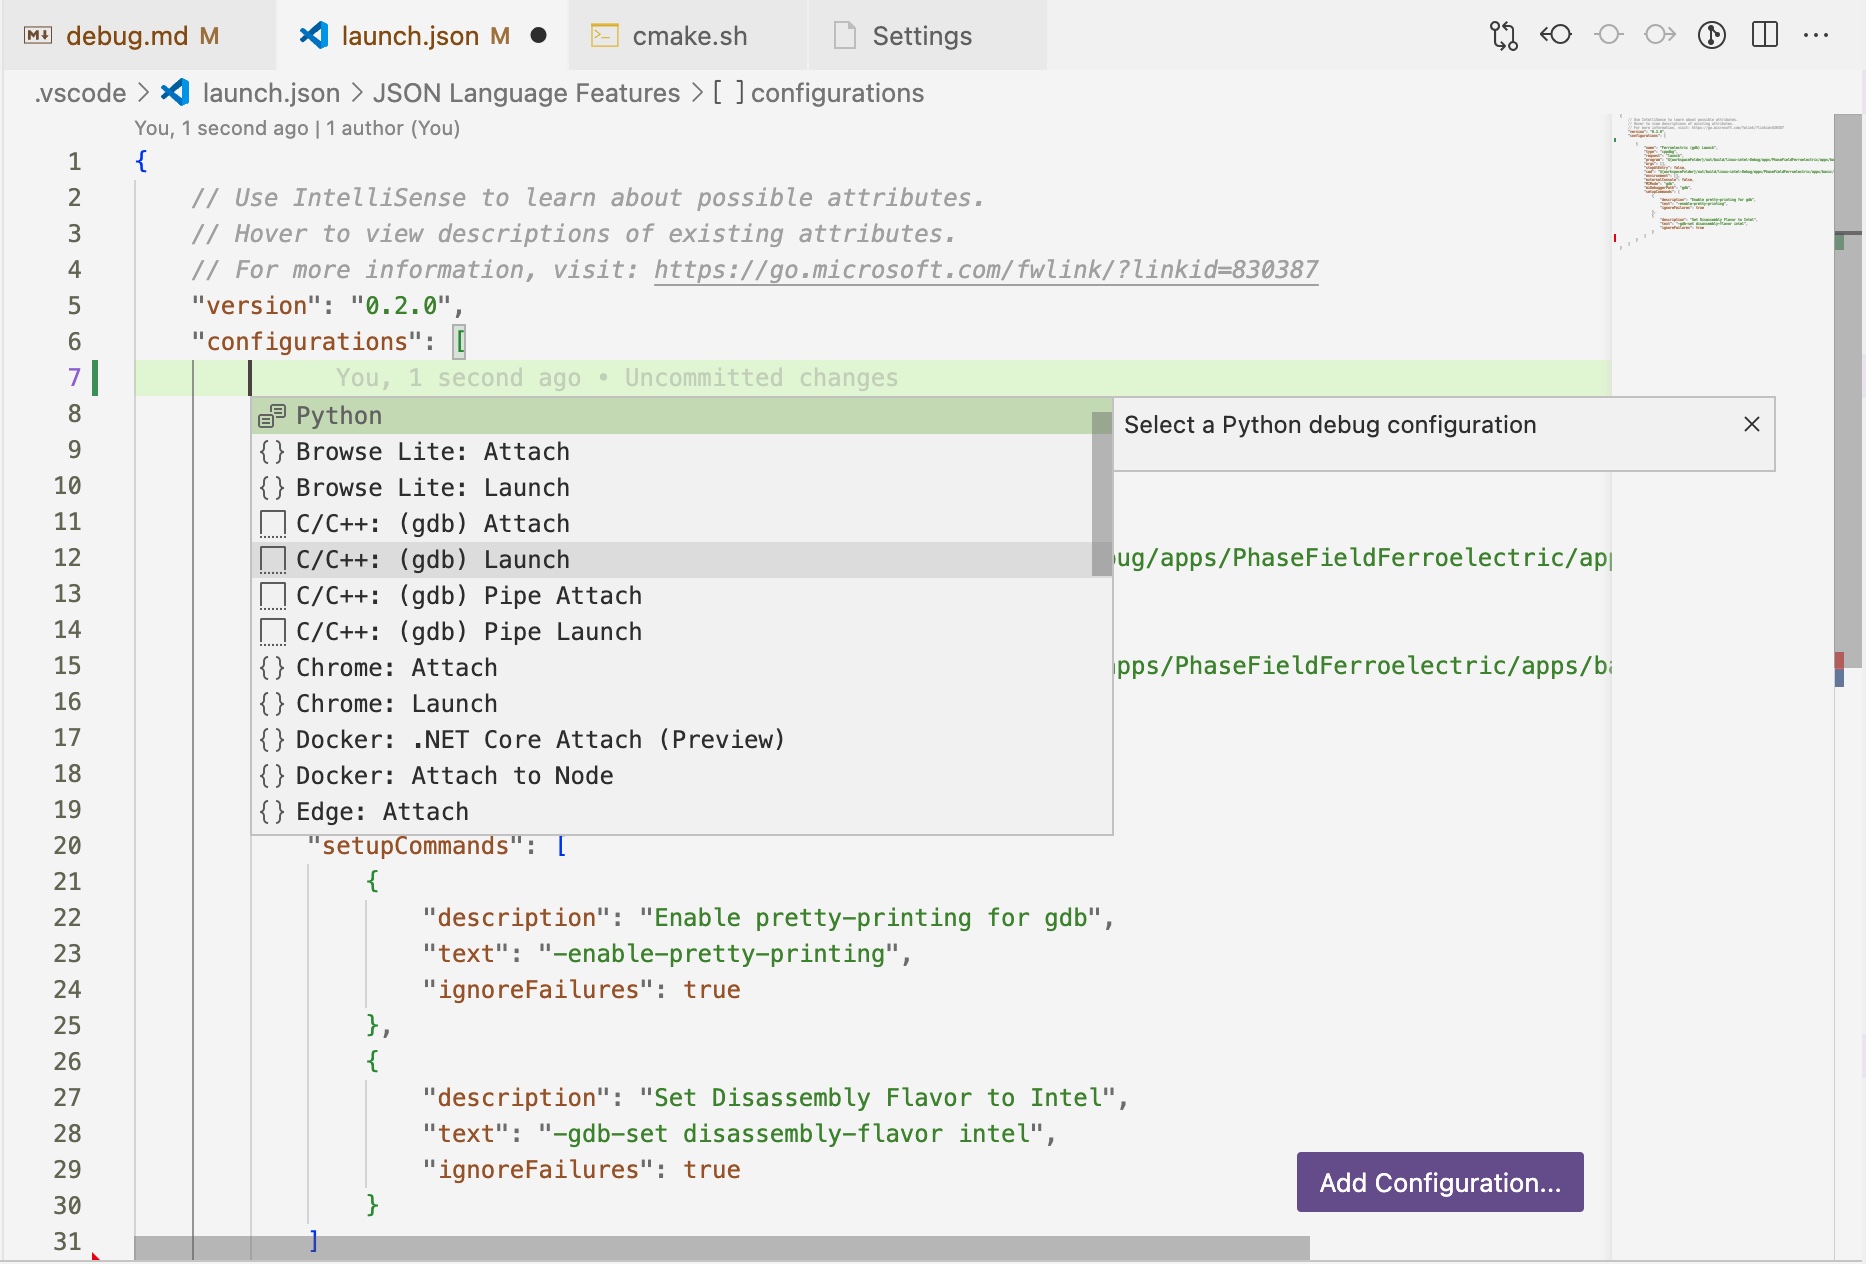
- Choose Add Configuration … in the RUN AND DEBUG dropdown menu. This will open the .vscode/launch.json file for you to edit.
- Select C/C++: (gdb) Launch, vscode will give a template to work with
- Edit the name (name for this launch), program (the executable), and cwd (current working directory for the program to run from)
Step 2: Start debugging
Click the green triangle button right of RUN AND DEBUG to start the debugger. Then you should see outputs start printing to the terminal and stop at the first break point you set.
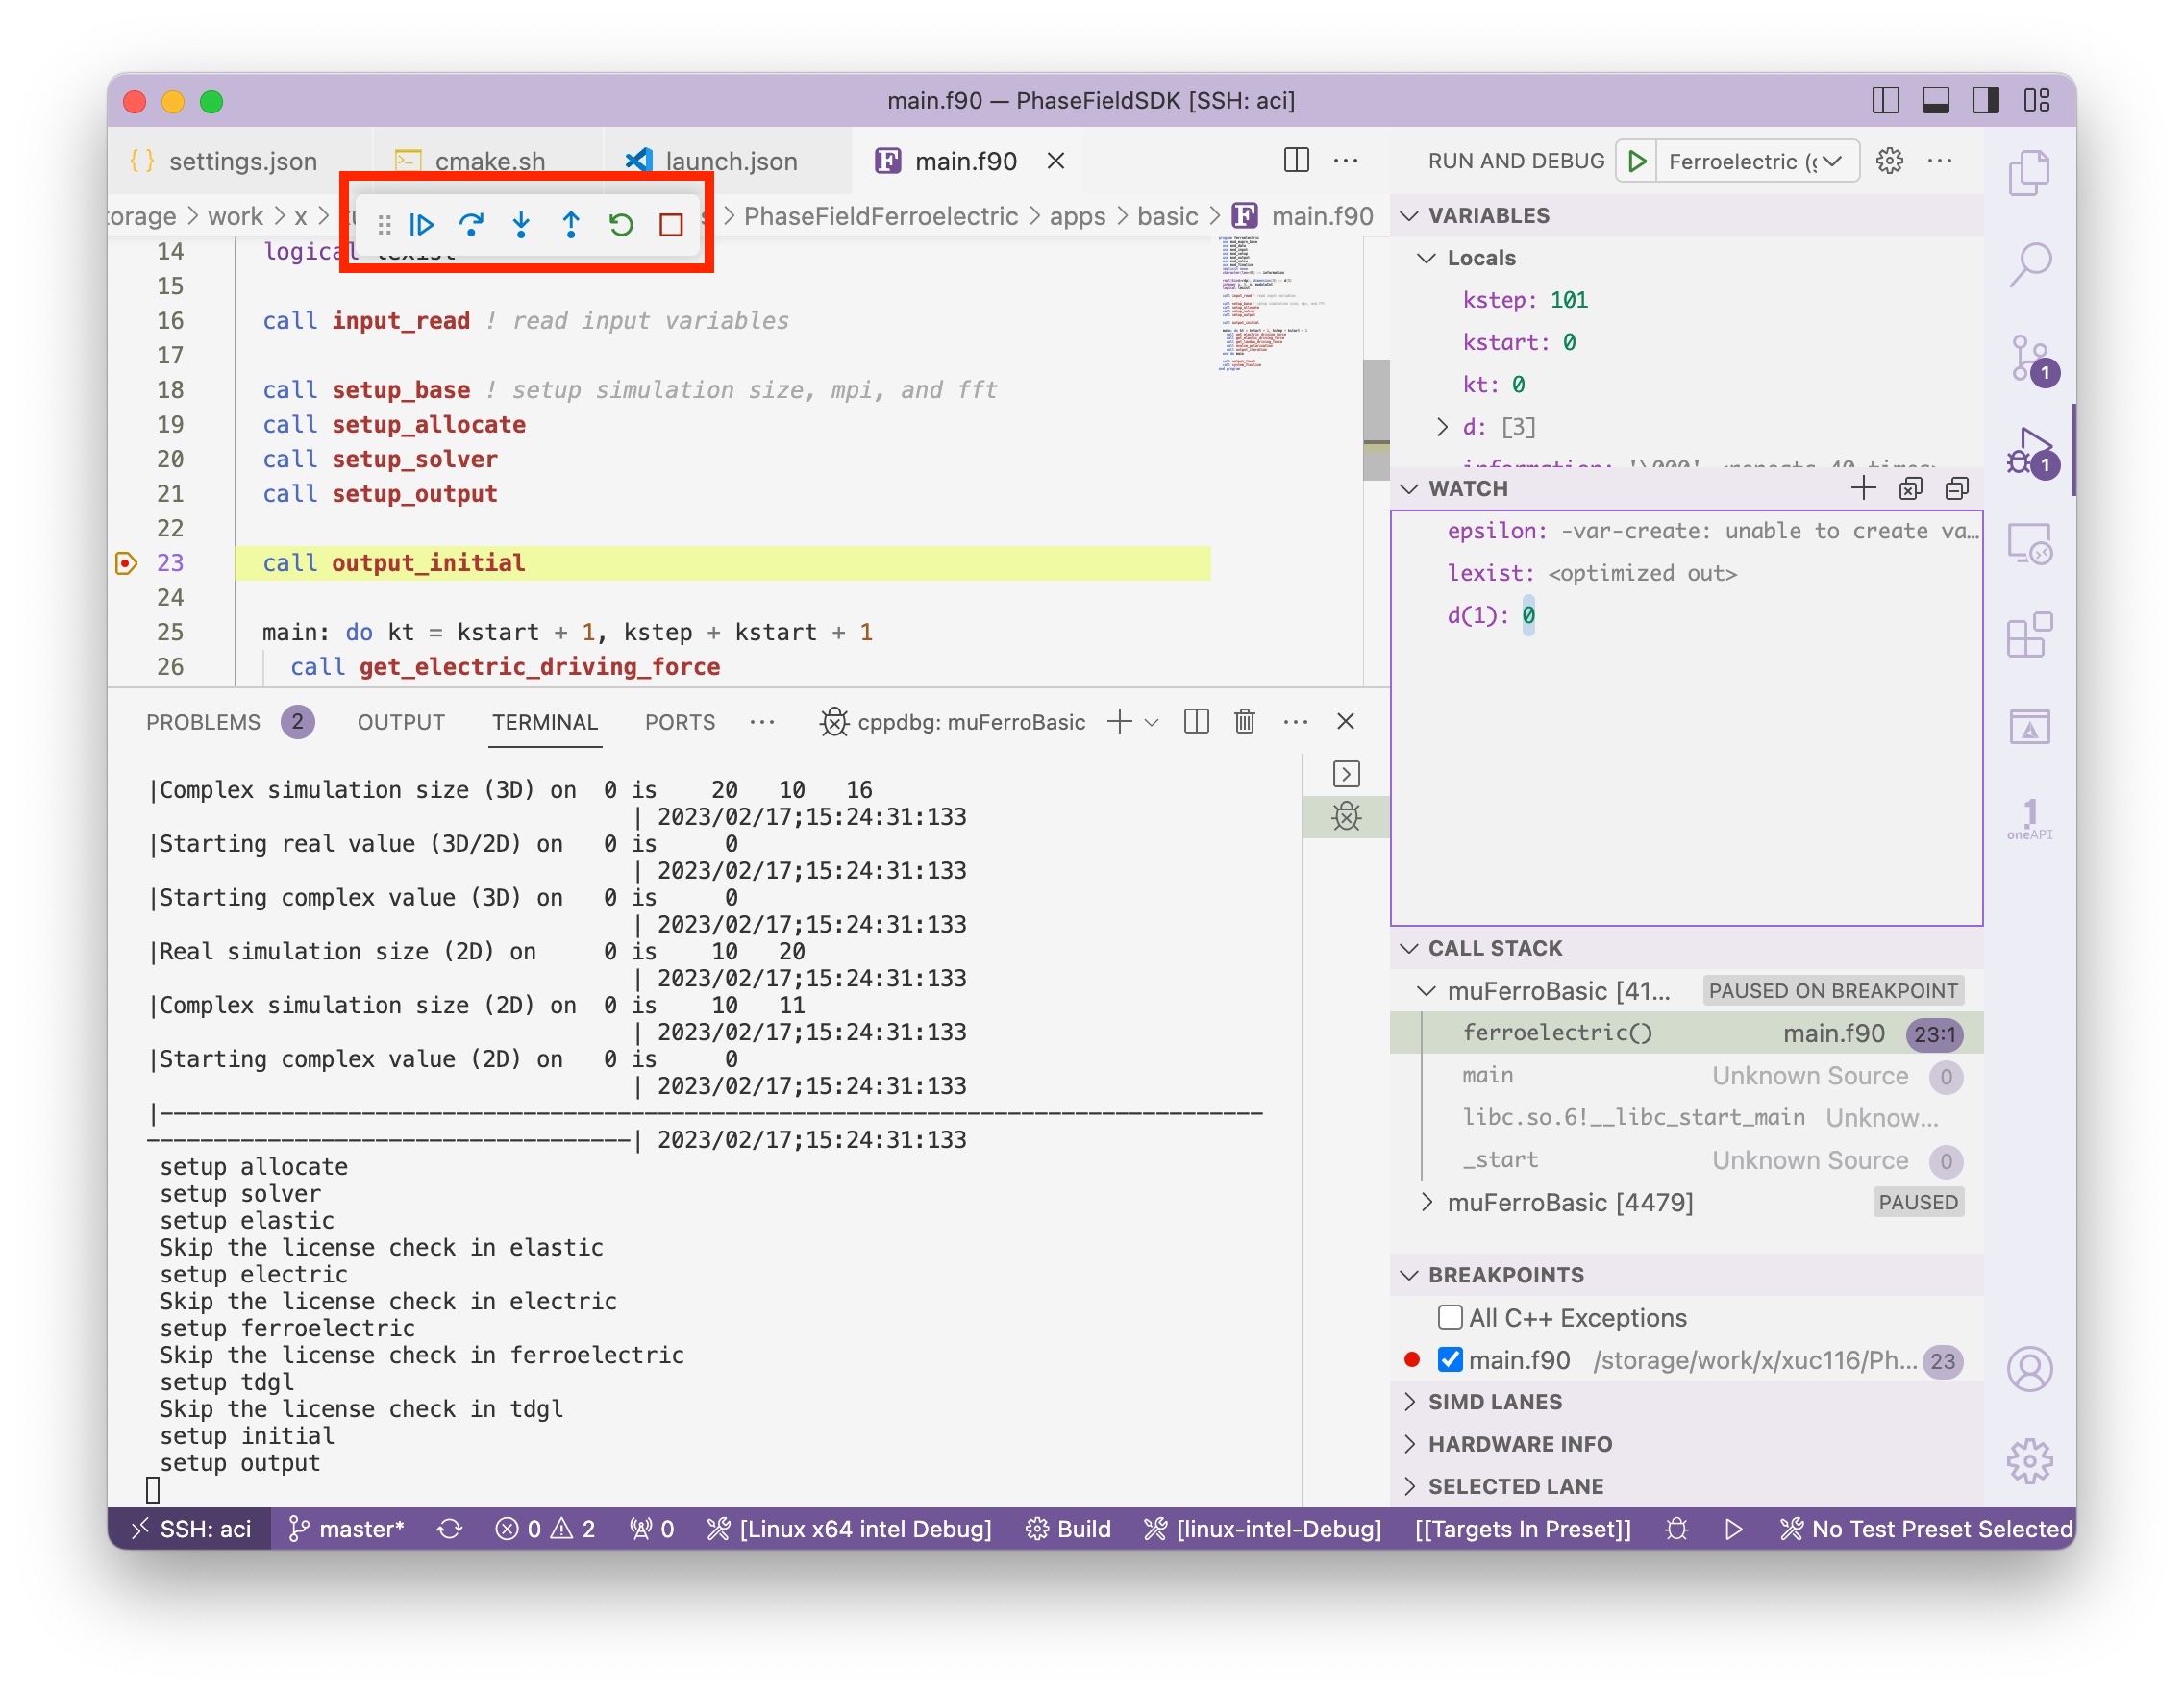
You can navigate through the code using the floating buttons (from left to right, continue, step over, step into, step out, restart, stop).
You can track variables as the program executes by double clicking in the WATCH area, or click the + button on the WATCH panel, then enter you variables name.
You can use expressions in the WATCH, such as use d(1) to get the first element of array d, use sizeof(d) to get the memory size of array d.
Commit
Whenever you have make any changes to the library or the main program, remember to git commit and push. You can do this using the source control plugin in vscode.
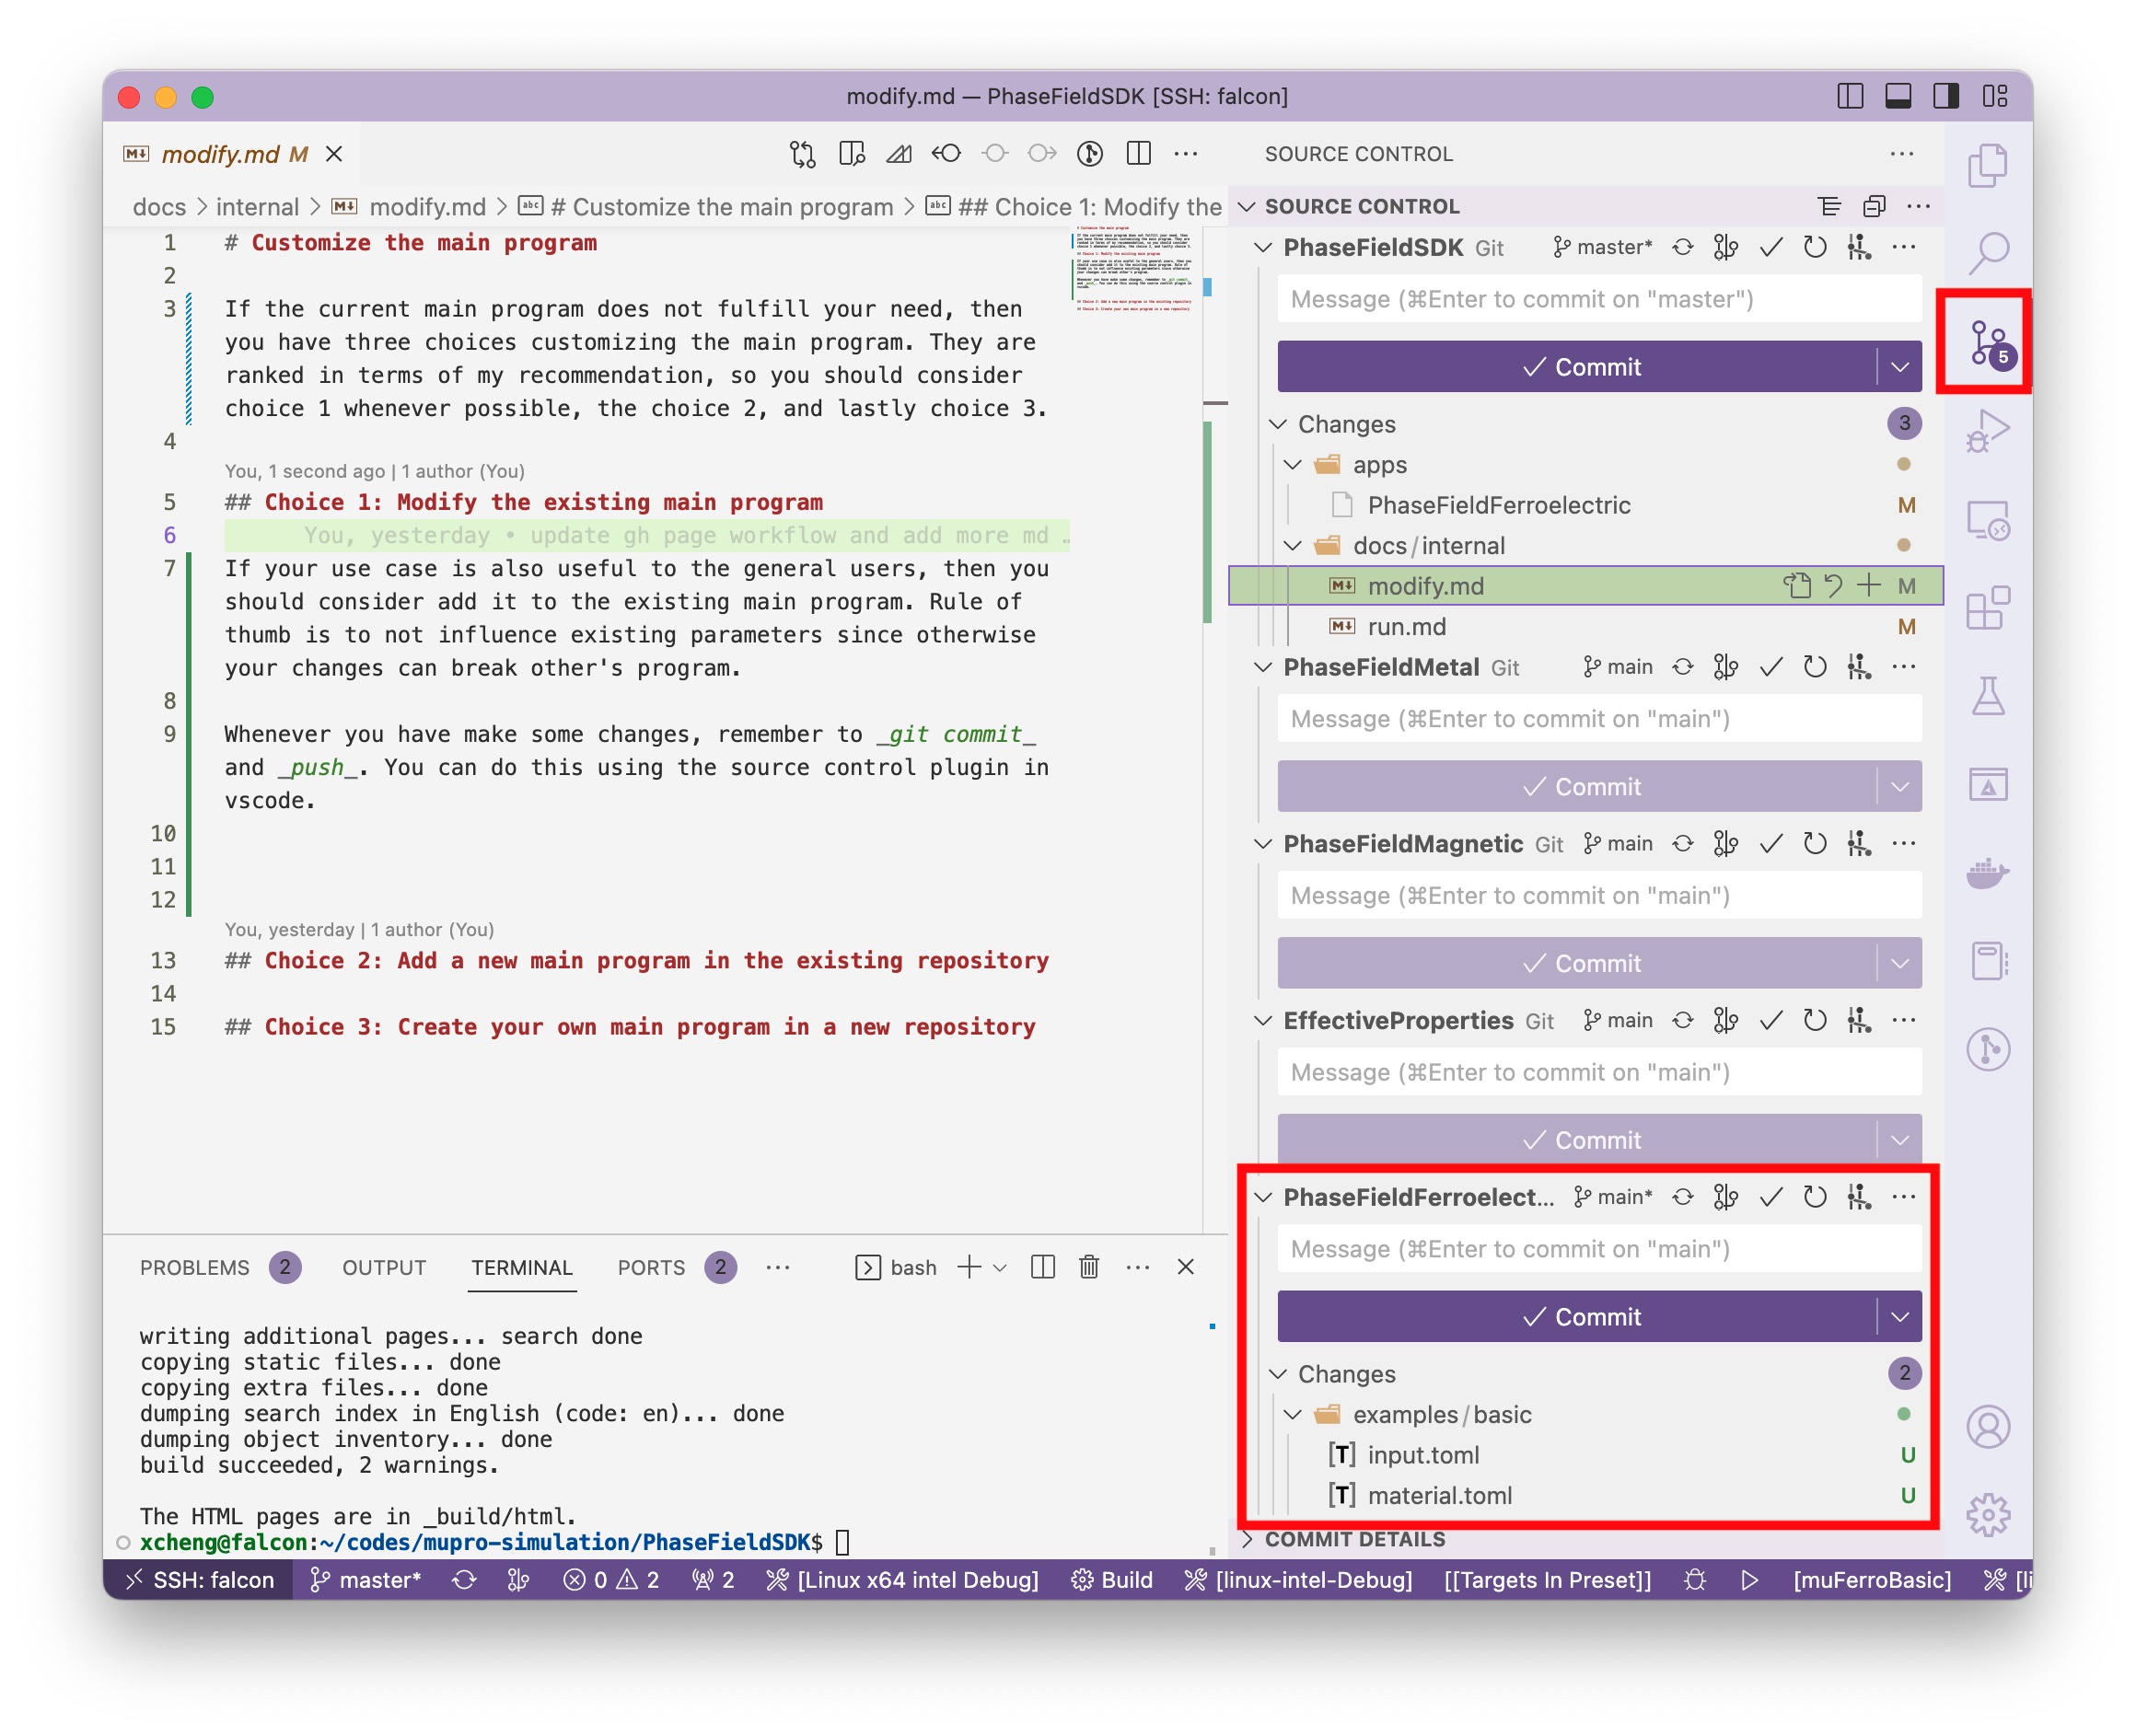
- Click the source control icon on the vertical toolbar
- Find the correct git repository to git. Since we have several submodules in our PhaseFieldSDK repository, you will see more than one section in source control panel. In the example below, we are trying to commit to the ferroelectric submodule.
- Type a short message describing what you have changed and click Commit button.
- Then the Commit button will become a Sync button, click and sync your local changes to the remote git server. Now you should be able to see you changes online in the Github repository.
Pull request
Once you have finished all the programming part you should create a pull request. It is called pull request because you are sending a request to the repository admin to pull changes in your branch into the main branch.
Senior code developer will review changes in your pull request and work with you to make them suitable for merging.